
Rendering Fox

Features

Foundry’s Katana 6.0 is Out Now!


Following the release of Nuke 14.0 and Mari 6.0, Foundry has released its powerful look development and lighting tool, Katana 6.0. In Katana 6.0 a new Performance tab was introduced, as well as LiveShadingGroups and Material Solo features to simplify your creation process.

According to Foundry, the two new USD improvements are designed to ensure that texturing pipelines are USD-ready. With the USD Look Exporter, artists can export a single USD Look file that contains all of the relevant shader information, reducing duplication of work in setting up USD Looks for use in Katana or other DCCs and bringing Look Development and Lighting together earlier on in the pipeline. Artists will also now have the ability to use Mari’s selection tools to assign materials to the correct USD face set-based location.


Mari 6.0 also introduces a simpler way to execute Python Scripts actions using Python Snippets as Shelf items, so artists aren’t required to install Python Scripts into the Scripts path before launching Mari. Finally, the teleport node: a node of two parts—Broadcaster and Receiver—that creates hidden connections in the nodegraph lands in this release. This allows artists to easily organize the nodegraph, clean up networks and reduce excess clicks, the teleport workflow saves valuable time and reduces the risk of strain from manual navigation. Artists can jump quickly between Broadcast and Receiver to quickly navigate the nodegraph without needing to find nodes manually


What's New in Katana 6.0?


Performance Tab

The new Performance tab allows users to debug their scenes more efficiently, becoming able to track the scale of the scene. You can see the number of nodes present in your project, as well as the number of contributing and selected nodes, and understand where the bottlenecks may lie in your Node Graph by analyzing the information.


Katana 6.0 features a new Performance tab so artists can keep track of the scale of their scenes. From the size of the Node Graph itself to time spent against various nodes, this new feature uses a customizable color-coded Heat map to help artists understand where bottlenecks may lie in the Node Graph and troubleshoot faster. 


Material Solo

The new Material Solo feature gives you instant access to all parts of the material setups, enabling you to quickly isolate and debug complex material networks.
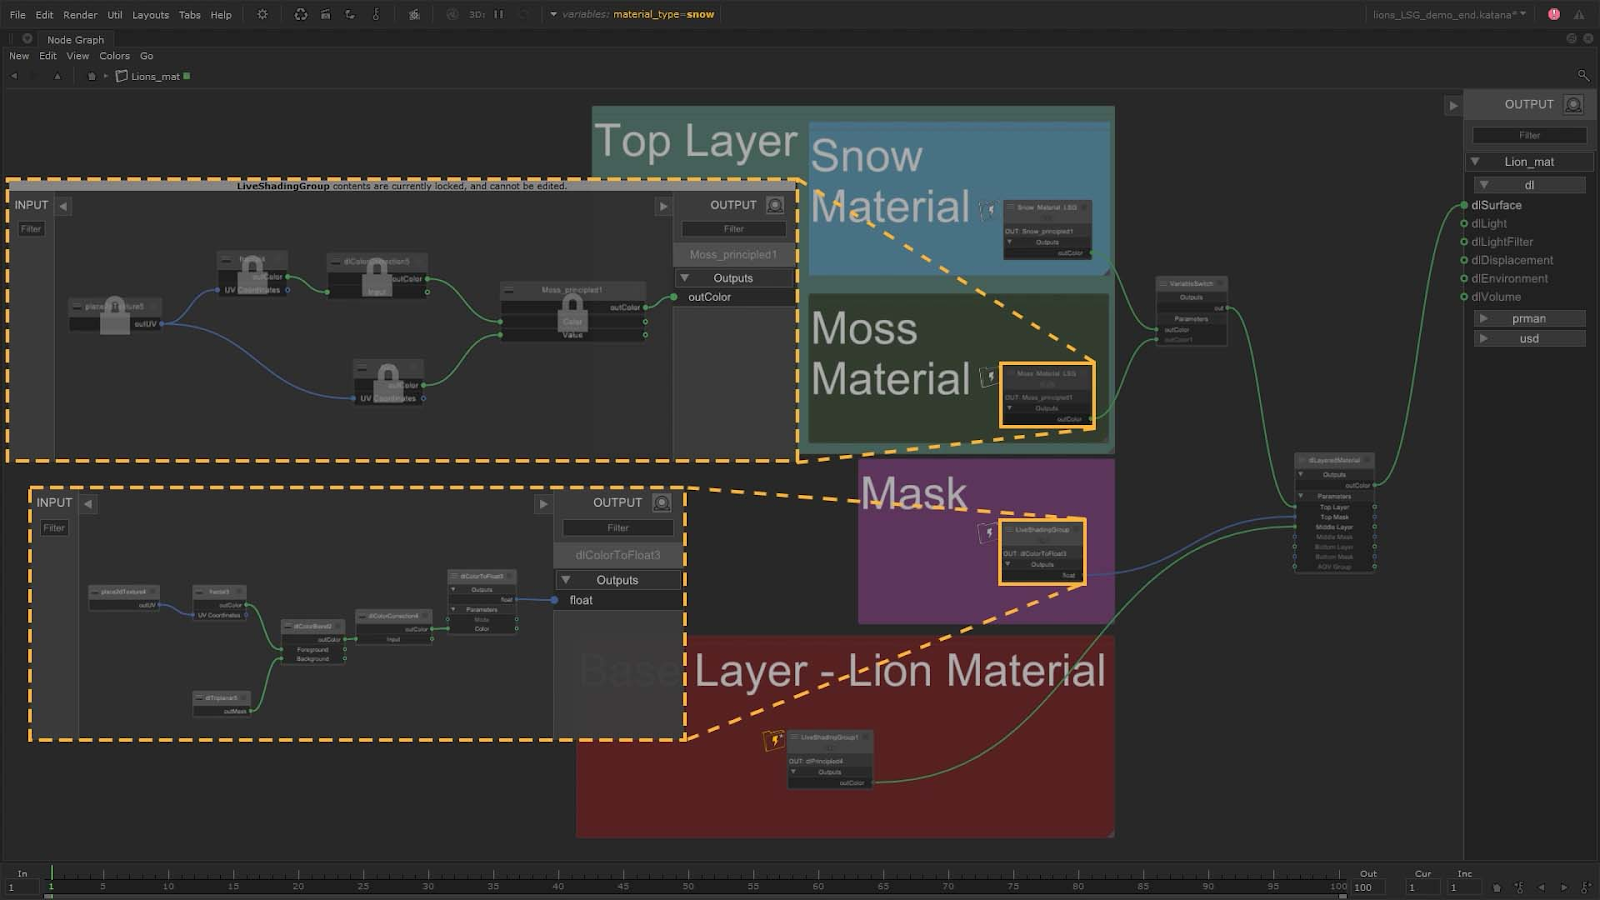

LiveShadingGroups

The new LiveShadingGroups feature extends Katana's lookdev toolset for a complete range of tools. LiveShadingGroups enables users to seamlessly share and reuse their work between projects, assets, or other artists. Any changes made to the original LiveShadingGroup are automatically applied to any scene that contains it, eliminating the need for manual updates when reopened.


NetworkMaterialEdit Material Interface

The new NetworkMaterialEdit Material Interface feature allows users to easily modify and manage the material interface within the NetworkMaterialEdit node. No longer limited to working in a linear way, now you have more freedom to modify setups downstream, which allows you to make changes without having the original material on hand and have better flexibility when working with material


Debug and troubleshoot

The Performance tab allows users to keep track of the scale of their scenes with more efficient debugging. From the size of the Node Graph to time spent against various nodes, the feature uses a customizable color-coded Heat map to help artists understand where bottlenecks may lie in the Node Graph for faster troubleshooting.


Learn more about Katana 6.0

.

Watch the overview of Katana 6.0:


Comments

Popular posts from this blog

VRay vs. Redshift vs. Arnold: Comparing Popular Rendering Engines

 Introduction Artists and animators need responsive, powerful tools for their 3D rendering work since the demands of this ever-evolving sector require agility and creativity. As such, having access to efficient ways of communicating ideas in a fast-paced environment is crucial in assisting them on that journey through digital artistry. Rendering engines are essential for creating breathtaking visuals, beautiful animations, and lifelike virtual scenarios as they allow artists to simulate various textures, materials, lighting, and effects.    Hurry Up & Avail your render coupon absolutely free! The capacity of the engine to render detailed environments is what makes it a crucial component in today's computer graphics world. Out of the countless rendering engines on the market today, three in specific have set themselves apart as top-tier tools to produce spectacular visuals - VRay, Redshift, and Arnold. These make up a major presence within all corners professional visual product

5 Best Rendering Software For Sketchup For Rendering Project

5 Best Rendering Software For Sketchup - Rendering Project What is Sketchup? Sketchup is 3D modeling software used to create and edit 3D models of buildings, landscapes, furniture, and other objects. Contents   Sketchup is an application for designing and sharing 3D models. It can be used by both professionals and amateurs, from simple shapes to highly detailed building models. Sketchup's features are easy to use and powerful enough for advanced users. Best Rendering Software For Sketchup  Sketchup's functionality Sketchup is 3D modeling software that helps architects and designers create accurate and detailed 3D models. there are two versions of this software. Sketchup Make is free and Sketchup Pro is $590. Sketchup pro has more advanced features than the accessible version of the software. some of these features include panoramic view rendering that allows users to view their project from any angle. users do not need any prior knowledge of 3D modeling or d

How To Get Render Farm Cost Estimate Calculator For Render Project

Cost Estimator Formula CPU Regions=(unit price x cores x performance parameter)x(1+ RAM )x render hour + software cost GPU Regions=(dual cards unit price/2 x cards x performance parameter)x(1+RAM )x render hour + software cost.   Description:  Unit price: the clients' current price status Core: the nodes' cores distributed during rendering  Performance parameter: Node performance coefficient  The default RAM cost is based on 64GB RAM, 128GB RAM, and 256GB RAM are optional with extra cost. 128GB :CPU 20%;GPU 20% 256GB :CPU 40%;GPU 40% Render  hour: the render time to finish one frame with one node  Software cost: the default value is 0 To know more click    Here   II. Node Configuration For CPU Regions Region Physical Core Performance parameter CPU Region 2 16 1 CPU Region 6 16 1 CPU Region 8 28 1 CPU Region 9 36 1.2 CPU Region 9 28 0.85 CPU Region 10 24 1 CPU Region 11 16 1 For GPU Regions Region Performance parameter GPU Region 1 1 GPU Region 1 1.35 GPU Region 11 2 GPU Region

Blender Vs 3Ds Max - What's the difference

Introduction   Blender and 3ds Max are 3D modeling programs commonly used by both hobbyists and professionals. they’re based on the same modeling type: polygon modeling. In this style, objects are composed of a mesh, polygons, and loops. to create a model and modify it, you directly manipulate these properties by moving, rotating, or scaling them. It’s different from techniques like sculpting, where you’d manipulate the object first and worry about the polygons later. Contents Both blender and 3ds Max are used for interior design, videogame props, character modeling, and even animation and visual effects (VFX). additionally, they both allow add-ons in their programs to increase their already extensive functionality. even though blender and 3ds Max are similar in principle, they have different layouts, work modes, and tools. Blender and 3Ds Max both are animation software used for creating different styles of 3D animations. they are used by individuals as well as organiz